Overview
The Settings page in ReturnPro offers tiles to manage key business operations, including marketplace integrations, return rules, user permissions, and billing, allowing full customization of your experience.
Marketplaces
The Marketplaces tile lets sellers connect and manage platform integrations. Select a marketplace and enter the required API authentication details to integrate.
Today ReturnPro supports
- Walmart.com
- Amazon.com
- Shopify
- MMi (Multi Marketplace Ingestion for any other marketplace not natively integrated)
Adding a New Marketplace
- Click + Connect new marketplace to initiate a new integration.
- Follow the prompts to authenticate your store and input any necessary credentials (such as Client ID or API key).
- Once integrated, the marketplace will appear in the list with its associated details.
Marketplace Grid
The Marketplaces table displays the following information for each connected marketplace:
- Marketplace: The name of the connected platform (e.g., Shopify, Walmart).
- Store Name: The name of your store on the marketplace, linked to the store URL.
- Store URL: The direct link to your store.
- Client ID: The unique identifier for your API connection, if applicable.
- Customer Support Email: The email address provided for customer support.
- Status: Indicates the current status of the integration (e.g., Active).
Temporarily disconnect a marketplace
In the Marketplaces grid, you have the option to temporarily disconnect a marketplace if needed:
- Click on the three-dot icon (⋮) located in the Status column for the specific marketplace.
- Select Disconnect temporarily from the dropdown menu.
This action will temporarily suspend the integration with the selected marketplace without permanently removing it. You can reconnect the marketplace later by following the same process, but selecting ACTIVATE or RECONNECT.
Business Details
The Business Details tile lets you enter and manage essential business information, ensuring accurate account setup, communications, and settings in ReturnPro..
Setting up business details
- Enter your official business name in the Business name field.
- Optionally, provide a Phone number to be used for communication purposes.
- Optionally, enter your Company URL to include your business website in the account details.
- Click Save.
Shopper Experience
The Shopper Experience tile lets you customize the returns process to match your brand. Control design elements to create a seamless, branded experience for your shoppers.
- Select the marketplace you would like to configure at the top of the drawer
- Create Your Custom URL – Personalize your returns portal URL and enable domain forwarding for easy customer access.
- Upload Your Brand Logos – Add your logo and favicon to appear on the portal and customer emails for brand consistency.
- Customize Brand Colors – Set primary colors and button/link colors to match your brand’s theme.
- Customize Typography – Choose a font for a consistent look across your portal.
You can also customize the text that is displayed to your buyers on the return portal by clicking the Customize Content button
Return Reasons and Eligibility
The Return reasons & eligibility tile provides tools for creating and managing return reasons for your store. This feature allows you to establish specific return reasons and determine which products are eligible for returns based on these criteria.
Configure your Return Reasons
1. Select the marketplace you would like to configure at the top of the drawer
2. Review the default return reasons
Return reasons for Amazon & Walmart cannot be modified.
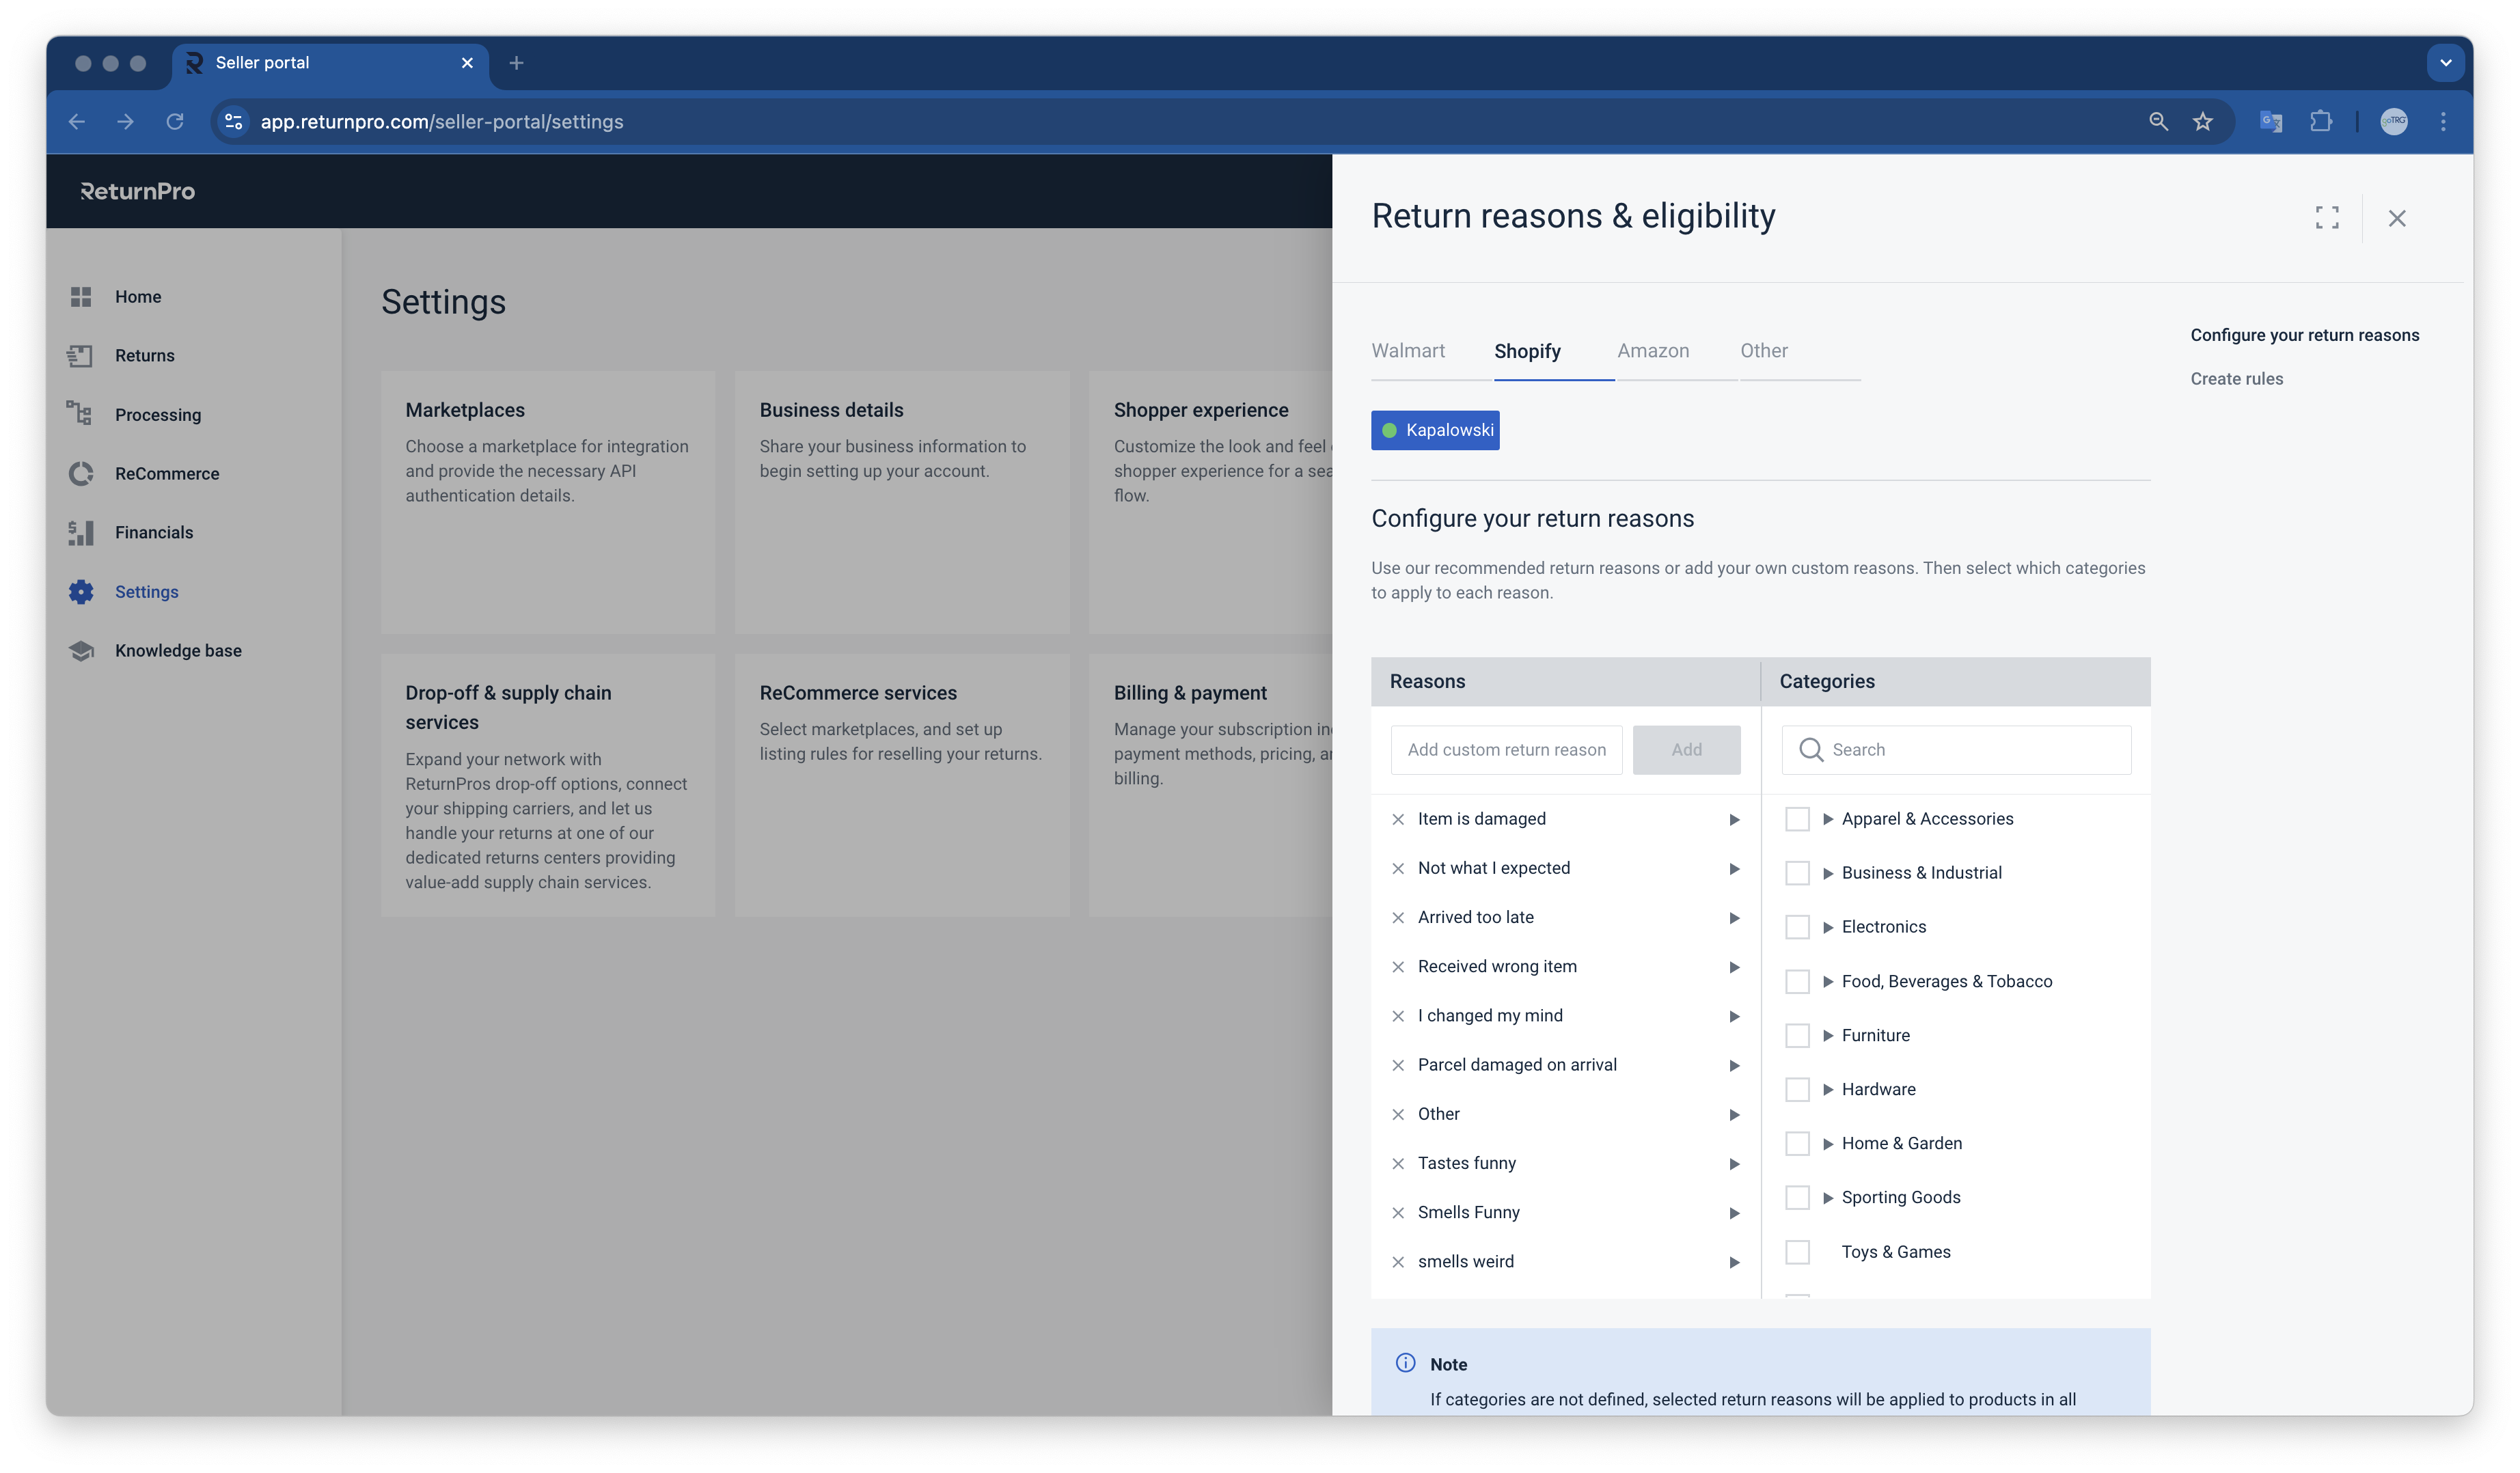 Shopify:
- Click the reason to view the product categories it applies to.
- To remove a reason, click x.
- To add a reason, type the reason in the Add custom return reason box and then click Add.
- To assign categories to a specific reason, click the reason and then select the desired categories using the checkboxes to the right. To remove categories, uncheck the checkbox next to the category.
If categories are not defined, selected return reasons will be applied to products in all categories.
Eligibility
Eligibility is where you can define what products are eligible for returns. There is a default rule already defined to handle all products, but you can add as many additional eligibility rules as you would like.
- To edit any eligibility rule, simply click on the rule name.
-
to Create a rule, click the Create new button
- enter a name for the rule at the top of the drawer
- in any rule (except for default) you can click the +/- buttons to add conditions for the rule and then select the variables you would like to apply from the dropdowns.
-
select the radio button at the bottom to define if the rule is eligible for returns or not
- if eligible, select the days eligible from the dropdown
-
- click Save once you are completed editing / creating a rule
Notes for Walmart
-
There is a minimum return window of 30 days on the Walmart Marketplace, which begins seven days after an item’s ship date. However, there are some exceptions. For more information, see Marketplace Returns Policy.
- For additional information, please visit WM Return Window and Eligibility Configuration.
Keep It, Exchanges, and Refunds
The Keep it, exchanges & refunds tile lets you customize return options for specific products. Configure whether customers can keep the item, exchange it, or receive a refund.
- Select the marketplace you would like to configure at the top of the drawer
- Select if you would like to make the return option Active or Inactive with the toggle
(please note not all return options are available for all marketplaces)
Keep It
Create a Keep it rule by clicking the Create new button
- enter a name for the rule at the top of the drawer
- in any rule (except for default) you can click the +/- buttons to add conditions for the rule and then select the variables you would like to apply from the dropdowns.
-
select the radio button at the bottom to define if the rule is eligible for keep it or not
- if eligible, select the further options that display when full or partial refund is selected
Exchanges
Create a Exchange rule by clicking the Create new button
- enter a name for the rule at the top of the drawer
- in any rule (except for default) you can click the +/- buttons to add conditions for the rule and then select the variables you would like to apply from the dropdowns.
-
select the radio button at the bottom to define if the rule is eligible for exchange or not
-
if eligible, select the further options that display when exchange is selected
-
Select your exchange method. You can offer an identical item for exchange, or use our recommendation engine to suggest items within your configured price range of the exchanged item.
-
-
if eligible, select the further options that display when exchange is selected
NoteAny item exchanges will be pushed from ReturnPro to your seller account based on the rules you configure in ReturnPro. You are responsible for fulfilling exchange orders through your seller account.
Refunds
Create a Refund rule by clicking the Create new button
- enter a name for the rule at the top of the drawer
- in any rule (except for default) you can click the +/- buttons to add conditions for the rule and then select the variables you would like to apply from the dropdowns.
- Approval method defines how a claim is approved. Automatic method indicates instant approval by the rules set up on this page. Manual approval indicates user review is required.
Refund method indicates how a refund will be issued. Select which refund method you want to make available to your customers.
Notes for Walmart
Keep It
Adjust your return settings to define “Keep It Rules” for certain non-returnable items.
For additional information, please visit WM Keep it Configuration.
Exchanges
Exchanges service is currently not supported by Walmart Marketplace.
Refunds
Refunds are automatically enabled for Walmart Marketplace. Walmart requires sellers to manually issue all refunds within 48 hours of receiving returned items. For more information, see Marketplace Returns Policy.
For additional information, please visit WM Refund Configuration.
Notes for Amazon
Keep it
Coming soon
Exchanges
Coming soon
Refunds
Coming soon
Drop-Off and Supply Chain Services
The Drop-off & supply chain services tile enhances returns management by integrating ReturnPro's drop-off options and connecting shipping carriers. Streamline returns with dedicated return centers and improved supply chain services.
- Select the marketplace you would like to configure at the top of the drawer
Connect Your Shipping Carriers
Connect your shipping carriers or use ReturnPro and take advantage of discounted rates with our established network of carriers
Use ReturnPro discounted shipping rates and save up to 50%
- To add shipping accounts click the Add Shipping Account button
- Then select which carrier you would like to add, currently ReturnPro supports
- UPS
- FedEx
- Canada Post
If you do not add and save your own carrier for your returns the system will automatically default to ReturnPro carrier network.
Notes for Walmart
The Returns Shipping Service (RSS) provided by Walmart is the default way to print labels for any item that is returned to a Walmart store. If you want to set up your own carrier account for your returns, please follow the instructions below to finish the configurations in Walmart Seller Central.
-
- Only FedEx and UPS are supported by Walmart.
- As a Walmart Marketplace seller, you are responsible for choosing the shipping tier and carrier method for your items unless you choose to ship with Walmart Fulfillment Services (WFS).
1. Navigate to Add Carrier Account on Returns Settings.
a. Log in to your Walmart Seller Central account using your Email and Password here.
b. Click Settings from the top navigation.
c. Click Returns under the Partner Profile heading to navigate to the Returns dashboard. You will find the options for Label printing.
d. Click the Add Carrier Account button.
2. Set up your carrier credentials.
a. Select Carrier and add your carrier credentials.
b. Click Continue to Address details, fill in address details, and then click Submit credentials.
If you change carrier credentials after setting up an account here, you will need to remove the account and add it again using your new credentials.
3. Set up your shipping rules.
- If you offer free shipping and use one of the Walmart-approved shipping carriers, please check your Automate Shipping Settings in Seller Center.
- If you don’t offer free shipping, you will need to use Manual Shipping Templates.
Additional Walmart Resources:
Suggested Carriers
Suggested Carriers for Parcel Shipments
Suggested Carriers for Freight Shipments
Best Practices for On-time Shipping and Delivery
Add Your Drop-Off Locations - COMING SOON
Expand your network with ReturnPro's drop-off options at select UPS and FedEx locations. Additional drop-off partners coming soon!
Notes for Walmart
- Walmart Marketplace allows your customers to drop off returns at any Walmart store in the United States
- Other Drop-off services are not supported by Walmart Marketplace.
Handle Your Returns
Configure how returns are handled with ReturnPro’s dedicated return centers in the U.S. and Canada. Services include receiving, sorting, refurbishing, sanitizing, repackaging, fulfillment, recycling, donating, and vendor returns.
Costs and fees for value add services provided by ReturnPro can be found here https://www.returnpro.com/pricing
Currently ReturnPro only supports sending your returns to our Fort Worth, Texas Facility (FORTX)
Coming soon:
- Frankfort, Kentucky (FRAKY)
- Bentonville, Arkansas (BENAR)
- Bradford, Ontario Canada (BRAON)
to Configure the Default rule, click the Default rule name
a. All products are automatically selected in the Condition field. You may set up additional rules for specified products to override the default rule.
b. Choose to let ReturnPro handle your returns or send your returns to your own location.
-
- If ReturnPro dedicated returns center for processing is selected, then add ReturnPro Processing Centers in Walmart Seller Central by following the steps in the WM Return Centers Configuration.
- If Enable other locations is selected:
- Please see the Notes for Walmart section below
Return Rule Prioritization
- Rules are applied bottom to top, with the default rule at the top holding the lowest priority (cannot be moved).
-
A new rule at the bottom takes precedence over the default rule.
- Example: If a rule routes blenders to Fort Worth, TX, they will follow that rule instead of the default.
- If no new rules match, the default rule applies.
- Errors may occur when saving rules due to conflicts with the default rule or invalid configurations.
- If new rules are created, there are exceptions with higher priority. Only if no match is found in other rules will the default rule will be applied.
to Create a rule, click the Create new button
- enter a name for the rule at the top of the drawer
- in any rule (except for default) you can click the +/- buttons to add conditions for the rule and then select the variables you would like to apply from the dropdowns.
-
select the radio button at the bottom to define what should be done with your returns
- ReturnPro dedicated returns center for processing
-
Disclaimer: Services listed below illustrate the full offering of what is available to be performed. ReturnPro will determine the best possible service to perform, based on our intelligent disposition engine.
-
ReCommerce
-
Sell as-is
-
Services: Receive, Check in, Sort, Putaway, Fulfill, Store
ReturnPro will receive and store your returns at the closest returns center that can handle your products. ReturnPro will list your items online and fulfill orders to buyers on behalf of you. ReturnPro will sell these items as-is. We will not invest any time or labor cost at your expense conducting unnecessary services on your items.
-
-
Refurb resell
-
Services: Receive, Check in, Sort, Putaway, Inspect, Grade, Sanitize, Repackage, Testing, Data wipe, Fulfill, Store
ReturnPro will receive and inspect your returns for physical damage and then repackage them in new bags or boxes so they are retail ready. ReturnPro will list your items online and fulfill orders to buyers on behalf of you.
-
-
Recycle
-
Services: Receive, Check in, Sort, Recycle, Store
We will responsibly recycle these items with our downstream recycling partners.
-
-
Donation
-
Services: Receive, Check in, Sort, Donate, Store
ReturnPro will responsibly donate these items to our charity partners.
-
-
Return to seller
-
Services: Receive, Check in, Sort, Putaway, Fulfill, Store
ReturnPro will consolidate your returns and ship them back to your designated location.
-
-
-
- ReturnPro dedicated returns center for processing
-
-
- Enable other locations: Use this to route your returns to other locations that you specify
- click Add ship back address to define other ship locations
- click Add ship back address to define other ship locations
- Enable other locations: Use this to route your returns to other locations that you specify
-
Notes for Walmart
Ensure you set the ReturnPro Processing Center as your preferred return destination in Walmart Seller Central.
- Follow the similar steps in the WM Return Centers Configuration to add the addresses in Walmart center.
- Log in to your Walmart Seller Central account using your Email and Password here. Click Returns under the Partner Profile heading to navigate to your Returns settings.
- View exiting Return Center addresses. On the Returns dashboard, you will find the settings for Return Centers. You will see the list of existing return centers on your account.
- Enter the exact Return Center address and information as they appear in Seller Central. Once finished, click the save button.
ReCommerce Services
The ReCommerce services tile lets you manage reselling returned products by selecting marketplaces for listings and configuring listing rules.
Marketplace Listing Rules
to Configure the Default rule, click the Default rule name
a. All products are automatically selected in the Condition field. You may set up additional rules for specified products to override the default rule.
to Create a rule, click the Create new button
- enter a name for the rule at the top of the drawer
- in any rule (except for default) you can click the +/- buttons to add conditions for the rule and then select the variables you would like to apply from the dropdowns.
- select the marketplaces you would like units that match the conditions defined above to list to
Please note: ReturnPro marketplaces will list products based on the best possible recovery that ReturnPro can get for your products.
Recommerce Rule Prioritization
- Rules are applied bottom to top, with the default rule at the top holding the lowest priority (cannot be moved).
-
A new rule at the bottom takes precedence over the default rule.
- Example: If a rule lists blenders to Shopify, they will follow that rule instead of the default.
- If no new rules match, the default rule applies.
- Errors may occur when saving rules due to conflicts with the default rule or invalid configurations.
- If new rules are created, there are exceptions with higher priority. Only if no match is found in other rules will the default rule will be applied.
Notes for Walmart
- Minimum recovery thresholds is not supported for Walmart.
Billing and Payment
The Billing & payment page lets you manage your ReturnPro subscription, including payment methods, pricing plans, and billing details.
1. Click View ReturnPro pricing to view more pricing details.
2. Change your subscription plan:
a. Click Manage subscription to select which plan you would like to subscribe to
b. Select the new subscription plan.
-
-
Upgrade plan: Upgrades happen immediately after they are confirmed in ReturnPro settings. The cost difference is prorated based on the days remaining in your current billing cycle.
- If you're upgrading to a High-Volume plan, please notify ReturnPro Support, and we'll apply the higher return limit to your account.
You can reach us by email at support@returnpro.com
or call us at 1 (800) 941-4777 between 7 am - 11 pm EST, Monday to Friday.
- If you're upgrading to a High-Volume plan, please notify ReturnPro Support, and we'll apply the higher return limit to your account.
- Downgrade plan: Downgrades will be processed on your Next billing date.
- Cancel subscription: Your subscription will be valid before your Next billing date, so you can continue to use ReturnPro fully until that time.
-
Upgrade plan: Upgrades happen immediately after they are confirmed in ReturnPro settings. The cost difference is prorated based on the days remaining in your current billing cycle.
Please note * If you exceed the number of returns within your selected tier, you will automatically be moved to the next level tier for the month. Then return to your original tier at the start of the next month. Supply Chain and ReCommerce services are charged in addition to the monthly tier subscription.
3. Review ReturnPro Invoices:
- Click the 3 dots in the action column (...) on the row of the invoice you would like to see more details for
- Download the PDF invoice or detailed CSV for more invoice details.
Below is a summary of the columns you will find in the SaaS CSV
Column Name Description InvoiceNumber invoice number (text) CreatedAt invoice creation date (datetime) DueDate invoice due date (datetime) Company company name (text) StreetAddress address line 1 (text) ExtendedAddress address line 2 (text) PostalCode postal code (text) CountryName country name (text) SubscriptionDescription describes what seller is charged for (text) Eg. SaaS Susbcription, Additional user seats etc. SubscriptionQuantity number of subscriptions seller is charged for (number) SubscriptionPrice subscription cost (cost) SubscriptionAmount SubscriptionQuantity * SubscriptionPrice (cost) OverLimitsReturnsDescription describes what seller is additionally charged for in case of overlimit returns (text) OverLimitsReturnsQuantity number of overlimit returns (number) OverLimitsReturnsPrice cost of overlimit return (need to discuss with Nikita, I think this was done for future when we will have cost per additional return) (cost) OverLimitsReturnsAmount OverLimitsReturnsQuantity * OverLimitsReturnsPrice (cost) AdditionalUsersDescription describes what seller is charged for in case they purchased additional user seats (text) Eg. Additional users fee AdditionalUsersQuantity number of additional user seats seller purchased (number) AdditionalUsersPrice additional user seat's cost (cost) AdditionalUsersAmount AdditionalUsersQuantity * AdditionalUsersPrice (cost) Discount discount amount (cost) Total invoice totals (cost) Tax tax amount (cost) Payment equals invoice totals. Was in the invoice example from accounting (cost) BalanceDue equals invoice totals. Was in the invoice example from accounting (cost)
Below is a summary of the columns you will find in the VAS (Value Add Services) CSV
Column Description
TrgId ReturnPro unique unit identifier Title Title of the item CategoryName Full category name (with root and leaf categories) Marketplace Marketplace unit sold on Store Seller name on marketplace Supply Chain Supply chain fees charged for unit (receive, check in, fulfillment) Value Added Services Value added service fees charged for unit (inspection, repack, accessorize, refurbishment) Return Shipping Fee Return shipping fee charged for unit Recommerce Shipping Fee Recommerce shipping fee charged for unit Recommerce Service Fee Recommerce shipping service fee charged for unit Total Sum of all fees for unit Recommerce Sale Price How much the unit sold for on Recommerce Order Closed Date When the unit sold on Recommerce - If you have any questions about your invoices, please see ReturnPro.com/Pricing.
- Download the PDF invoice or detailed CSV for more invoice details.
Payment Methods
Manage your ReturnPro payment methods.
Update a Payment Method:
a. Click the More actions (. . .) next to the payment method.
b. Click Edit.
c. Edit the credit card details
d. Click Save card.
Add a New Payment Method:
a. Click + Add new.
b. Select your preferred payment method.
c. Enter the required details and then click Save.
Set a Default Payment Method:
a. Click More actions (. . .) next to the payment method.
b. Select Set as default.
c. Confirm your action.
To Delete or Disconnect a Payment Method:
a. Click More actions (. . .) next to the payment method (if you only have 1 card, this is considered your default card, and the default card cannot be deleted).
b. Select Delete/Disconnect.
c. Confirm your action.
-
- If you would like to apply for a refund, please contact ReturnPro Support for further assistance.
You can reach us by email at support@returnpro.com
or call us at 1 (800) 941-4777 between 7 am - 11 pm EST, Monday to Friday. - The payment method will be used for monthly subscription fees, over-limit return charges, Supply Chain Service charges, ReCommerce charges, and Shipping charges in ReturnPro.
- If you would like to apply for a refund, please contact ReturnPro Support for further assistance.
Users
The Users tile lets you manage account access by adding users and setting their permissions.
Add Additional Users and Set Permissions
to Create a new user, click the Create new button
- 2. Enter the new user’s information, including:
- Full name
- Contact number
- Email address
- Password (user will be forced to select a new password on first log in)
- Enable the desired account permissions using the toggle buttons.
- New users can be given Full access or View-only access for each enabled permission.
- Click Save.
to Modify a user settings / permissions, click the user name you wish to modify
to Deactivate or Delete as user, click the 3 dots (...) and select the appropriate action
DOC3886.2
Comments
1 comment
Unfortunately, I don't find an answer to my question.
What can I do with my returned items after they have been stored at Returnpro warehouse?
For example, I sold an item on my own website and I want to instruct Returnpro to ship this item. I have a shipping label purchased elsewhere.
Is it possible?
Please sign in to leave a comment.